How to Paint a Ceiling: 4 Steps That Actually Work
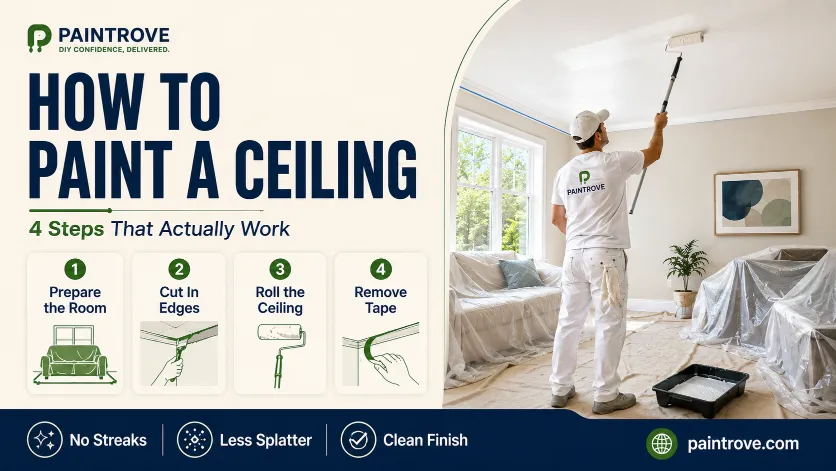
How to Paint a Ceiling? Painting a ceiling takes four steps: prepare the room, cut in the edges with a brush, roll the field in overlapping passes, and remove the tape while the paint is still wet. Most standard rooms can be painted in a single day, including dry time between coats.
Done right, a freshly painted ceiling makes a room look cleaner, brighter, and taller — without touching a single wall. Done wrong, you get lap marks, splatter on every surface, and a sore neck for three days. This guide covers everything you need to paint a ceiling like a professional — including how to avoid streaks, drips, and the mistakes beginners make every time.
What You Need to Paint a Ceiling
Gather everything before you move a single piece of furniture.
Paint and Primer:
- Ceiling paint — flat finish only (Sherwin-Williams Premium Ceiling Paint, Benjamin Moore Waterborne Ceiling Paint, or Behr Premium Plus Ceiling Paint are all reliable options)
- Stain-blocking primer for any water damage, smoke stains, or bare patches — Zinsser Bulls Eye 1-2-3 or Sherwin-Williams Extreme Block Interior/Exterior Stain Blocking Waterbased Primer
Application Tools:
- 9-inch paint roller frame — Purdy Revolution 9″ Roller Frame is a solid choice
- Roller cover — 3/8-inch nap for smooth ceilings; 1/2-inch nap for lightly textured; 3/4-inch nap for heavily textured ceilings
- Extension pole — Purdy POWER LOCK Professional Grade Extension Pole or any locking pole that reaches your ceiling comfortably
- 2.5-inch angled bristle brush for cutting in edges
- Handy Paint Pail or small bucket for carrying paint while cutting in
- Paint tray and tray liner (a 9″ Roller Tray Pack works well)
Prep and Protection:
- Painter’s tape — 1.88 inches wide minimum; Frog Tape for the cleanest lines
- Drop cloths — canvas for floors, plastic sheeting for furniture
- Ladder — a 6-foot ladder handles 8-foot ceilings; borrow or rent taller for vaulted ceilings
- Safety glasses — ceiling painting drips; protect your eyes
- Plastic bags or Ziploc bags for storing wet brushes between coats
Optional but Useful:
- Wagner SMART Roller for large ceilings — it feeds paint through the handle so you refill less often
- Purple-tinted ceiling paint — dries white but lets you see where you have painted so you do not miss spots
- Spackle and putty knife for filling cracks before painting

Step 1 — Prepare the Room
Good ceiling prep takes 30–60 minutes and determines how clean your result looks.
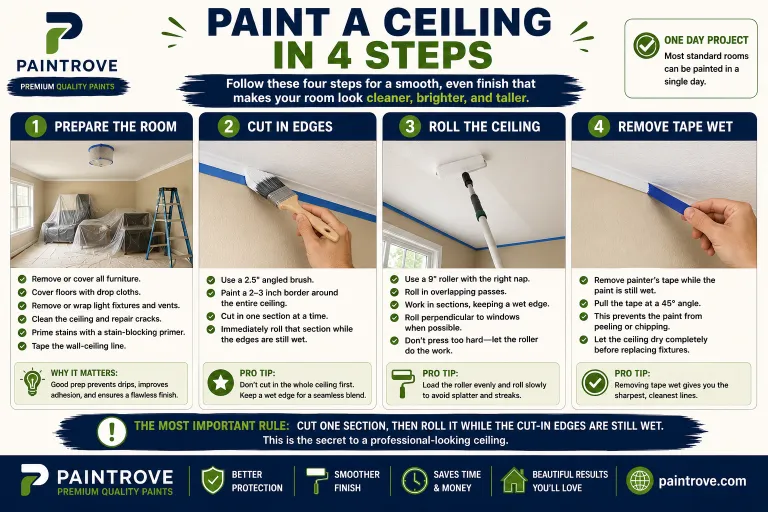
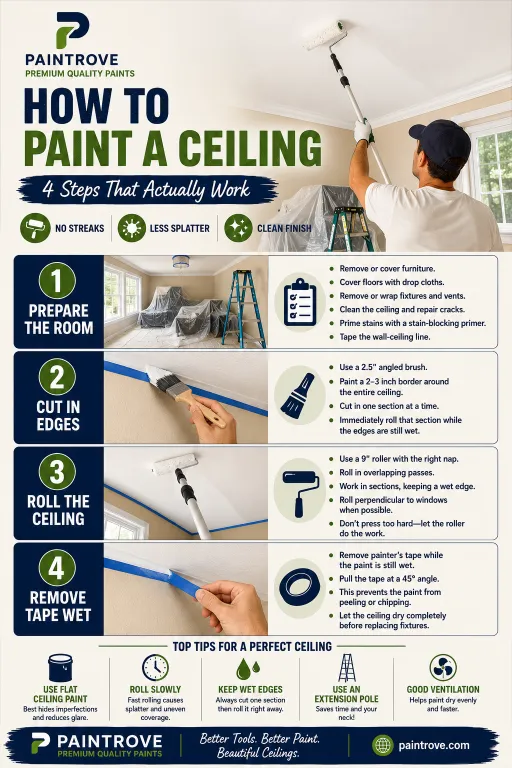
Clear the room. Remove as much furniture as you can. Push large pieces to the center of the room and cover them with plastic sheeting or old blankets. Ceiling paint drips and spatters — everything needs to be covered.
Lay drop cloths. Spread canvas drop cloths across the entire floor. Use plastic sheeting under the canvas if you are working over carpet. Canvas absorbs drips; plastic lets them pool and spread.
Remove or tape off ceiling fixtures and vents. Removing light fixtures gives you the cleanest result. Before removing any electrical fixture, turn off the power at the breaker — not just the switch. If you prefer to leave fixtures in place, wrap them tightly with painter’s tape and plastic sheeting.
Clean the ceiling. Dust and grime affect paint adhesion and show through the finish. Dust the ceiling with a microfiber duster or a damp cloth attached to an extension pole. Pay attention to corners, edges near the HVAC vents, and any areas near the kitchen or bathroom where grease or steam accumulates.
Repair cracks and damaged areas. Fill any cracks with spackle using a putty knife. Smooth flush with the ceiling surface, let dry, and sand smooth before priming. Painting over unfilled cracks highlights them rather than hiding them.
Prime stains before painting. Water damage stains, smoke marks, and grease spots bleed through ceiling paint — sometimes through three coats — without a stain-blocking primer. Apply Zinsser Bulls Eye 1-2-3 or an equivalent oil-based stain blocker to any discolored areas. Let it dry completely before painting.
Tape the wall-ceiling line. Run painter’s tape along the top edge of each wall, pressed firmly against the wall surface just below the ceiling line. Press every inch with your fingertip or a credit card to prevent bleed. If you are painting the walls the same day, you can skip taping and paint the ceiling down the wall a few inches — then tape off the ceiling when you paint the walls.
Step 2 — Cut In the Ceiling Edges
Cutting in means painting a 2- to 3-inch band around the entire ceiling perimeter with an angled brush before rolling. This lets the roller work freely without worrying about getting paint on walls.
Load a 2.5-inch angled bristle brush about one-third up the bristles. Tap off the excess inside the pail. Start each stroke slightly away from the edge, then guide the brush tip toward the tape line in one smooth motion. Cut in line control is the hardest skill in ceiling painting — work slowly and move from the shoulder, not the wrist.
The most important rule: Cut in one wall section, then immediately roll that section while the cut-in edges are still wet. Do not cut in the entire ceiling and then roll. Wet cut-in edges blend invisibly into the rolled surface; dry edges create a visible “frame” of brush marks around the perimeter of the ceiling.
Use a Handy Paint Pail rather than a full gallon can for cutting in. The bucket has a handle that hooks over your hand or ladder rung, keeping both hands available — one for the brush, one for steadying yourself.
Step 3 — Paint the Ceiling with a Roller
Rolling the ceiling is where most of the work — and most of the mistakes — happen. Follow this technique and you will avoid streaks, lap marks, and drip patterns.
Setting Up the Roller
Attach your roller cover to a 9-inch roller frame and connect it to your extension pole. An extension pole long enough to reach the ceiling while you stand on the floor is the single biggest time-saver in ceiling painting — it eliminates constant ladder repositioning and lets you roll in long, controlled passes.
Pour paint into the tray liner to the halfway mark. Load the roller by rolling it into the deep end of the tray and back across the ridged surface several times. A well-loaded roller has paint distributed evenly across the full nap — not dripping, not dry.
Rolling Technique: No Streaks, No Lap Marks
Roll perpendicular to the windows. Light enters from the windows and rakes across the ceiling at a low angle — rolling parallel to the windows shows every roller mark. Rolling perpendicular to the windows means the marks run away from the light source and become nearly invisible when dry.
Start in a corner and work in sections. Begin in the corner farthest from the room’s entrance. Apply the paint in a W or M pattern — roll a 3- to 4-foot W shape to spread paint across the section, then smooth with overlapping parallel passes from one side to the other. Keep strokes going in the same direction within each section.
Maintain a wet edge. Move to the next section before the edge of the previous one dries. Overlapping into a dry edge creates a hard line — a lap mark — that shows clearly once the paint dries. Work at a steady pace and do not go back over sections that have started to dry.
Roll slowly. Fast rolling throws paint. Ceiling splatter comes almost entirely from rolling too fast. Slow, steady passes keep the paint on the ceiling and off your face.
Use a low-nap roller for smooth ceilings. A 3/8-inch nap on a smooth ceiling gives a flat, even finish with minimal texture. Switch to a 1/2-inch nap for lightly textured ceilings and 3/4-inch for heavy or popcorn texture — the deeper nap pushes paint into the recesses of the texture for more uniform coverage.
Two Coats
Most ceilings need two coats for full, even coverage. Flat ceiling paint has less binder than wall paint, so it can be slightly more transparent in a single coat. Apply the first coat, let it dry for at least 1 to 2 hours (check the label — Sherwin-Williams Premium Ceiling Paint recommends 2 hours before recoating), then apply the second coat.
Apply the second coat in the same direction as the first. Two thin coats always cover better and look smoother than one heavy coat.
Step 4 — Remove Tape and Reattach Fixtures
Pull painter’s tape while the final coat is still slightly wet — not fully dry. Pull at a 45-degree angle slowly and steadily. Tape removed from dry paint can pull chunks of the finish with it, leaving a ragged edge rather than a clean line.
After tape removal, touch up any bleed spots or thin areas with a small angled brush. Let the ceiling dry completely — typically 2–4 hours for flat latex ceiling paint — before reattaching light fixtures and vents, removing drop cloths, and moving furniture back.
Painting a Ceiling Without Splatter
Splatter is the number-one complaint about ceiling painting. Here is how to eliminate it.
Use the right paint. Ceiling-specific paints are formulated to minimize spattering. They are thicker than wall paint — this viscosity helps the paint cling to the roller and release smoothly onto the surface rather than flicking off. A premium ceiling paint and primer in one from Sherwin-Williams or Behr is worth the slightly higher cost specifically for this reason.
Do not overload the roller. An overloaded roller throws paint. After loading, roll back across the ribbed section of the tray to remove excess. The roller should look fully covered — not dripping.
Roll slowly. This is the most effective single change you can make. Every experienced painter will tell you the same thing: speed causes splatter. Slow the roll down.
Wear safety glasses. Even with perfect technique, ceiling paint drips. Protecting your eyes is not optional.
Use purple-tinted ceiling paint. The tinted formulation (goes on pink or purple, dries white) lets you see exactly where you have painted so you do not double-back over dry sections — which causes exactly the kind of overloaded re-rolling that generates splatter.

Painting a Ceiling for Beginners: Common Mistakes to Avoid
Not using an extension pole. Getting on and off a ladder constantly breaks your rhythm, causes you to roll over drying edges, and exhausts you before the room is half done. An extension pole is a $20 investment that changes the entire experience.
Cutting in the whole ceiling before rolling. The edges dry while you cut in the rest of the room. When you roll, you roll over dry brush marks and create a visible line. Cut one section, roll immediately.
Using the wrong roller nap. A 3/8-inch nap on a textured ceiling leaves bare patches in the low spots of the texture. Match the nap to the ceiling surface.
Not priming water stains. Water stains bleed through ceiling paint reliably. One coat of stain-blocking primer eliminates this problem; three coats of ceiling paint without primer usually do not.
Skipping the second coat. One coat of flat ceiling paint over an old, stained, or differently colored surface almost never gives full coverage. Budget for two coats from the start.
Rolling too fast. Say it again: rolling too fast causes splatter. Slow down.
Not protecting the floor. One drip on an unprotected hardwood floor — especially a dark stain — is harder to clean than painting the entire room.
How to Paint Specific Ceiling Types
Painting a Popcorn or Textured Ceiling
Use a 3/4-inch or 1-inch nap roller cover. Do not press hard — let the weight of the loaded roller do the work. Pressing too hard flattens the texture. Use slow, light passes and do not try to smooth the finish the way you would on a flat surface. Two coats minimum — popcorn texture absorbs paint heavily and uneven coverage shows clearly.
Do not sand a popcorn ceiling before painting without first testing for asbestos. Popcorn ceilings in homes built before 1980 may contain asbestos; disturbing the texture releases fibers. If you are unsure, use an asbestos test kit before doing anything to the surface.
Painting a Knockdown or Skip Trowel Ceiling
A knockdown ceiling has a heavy, layered texture from troweled drywall compound. Use a 1/2-inch nap roller for moderate knockdown and a 3/4-inch for heavy knockdown. Roll slowly and do not press the roller into the texture. Two to three coats are typically needed for full, even coverage.
Painting a Tray Ceiling
A tray ceiling has a stepped recess in the center — essentially a ceiling with interior walls and a flat upper section. Paint the outer ring (the angled or vertical step sections) first with a brush and roller, treating them like short walls. Then paint the flat inner ceiling section last. If you are using a different color on the tray ceiling than on the walls, tape carefully at the transition.
Painting a Vaulted Ceiling
A vaulted ceiling requires more ladder work — an extension pole handles the lower portions, but the peak typically needs ladder access. Work in sections from the bottom of the slope to the peak. Cut in the ridge line at the top with a brush, then roll downward in overlapping passes. Maintain a wet edge at all times — vaulted ceilings have large surface areas and sections can dry faster than flat ceilings.
Painting a Basement Ceiling
A basement ceiling is typically unfinished — exposed joists, pipes, and ductwork. Most homeowners paint these elements the same color as the ceiling for a cohesive look. Use a paint sprayer for exposed joists — a roller cannot reach between the joists efficiently. Flat or matte black is the most popular choice for exposed basement ceilings: it absorbs light, making the structural elements recede visually and giving the space an industrial look.
Painting a Ceiling with a Brush (No Roller)
Painting a ceiling without a roller is practical for very small rooms — a closet, a powder room, or a small bathroom. Use a 4-inch flat brush or a wide wall brush. Work in parallel strokes from one end of the ceiling to the other, maintaining a wet edge. The finish will show more brush marks than a rolled surface — this is more visible in raking light, so flat paint is especially important here.
Painting a Ceiling with a Sprayer
A paint sprayer is the fastest method for painting large ceilings or exposed structural ceilings. For interior ceilings, use an airless sprayer with a fine-finish tip. Mask everything completely — walls, floors, furniture, fixtures — because overspray carries several feet. Thin the paint according to the sprayer manufacturer’s specifications. Work in parallel passes, overlapping each pass by 50%. A sprayer finishes a ceiling in a fraction of the time of rolling but requires significantly more masking and cleanup.
Painting a Ceiling After Water Damage
Water damage leaves stains that bleed through ceiling paint — even through multiple topcoats — without proper sealing.
- Fix the source of the water first. Painting over active or recent moisture damage is temporary — the stain will reappear and the paint will eventually peel.
- Let the affected area dry completely — at least 24–48 hours after the source is repaired.
- Apply a stain-blocking primer — shellac-based (Zinsser BIN) or oil-based (KILZ Original) — to the stained area. Extend the primer 2–3 inches past the stain boundary.
- Allow the primer to dry fully (30–60 minutes for shellac, 1–2 hours for oil-based primer).
- Apply two coats of ceiling paint over the primed area. For a patch in the center of a ceiling, rolling the entire ceiling rather than just the patch gives a more uniform result.
Painting a Peeling Ceiling
Peeling ceiling paint has an adhesion failure underneath. Painting over peeling paint without addressing the cause just adds weight to a surface that is already losing its grip.
- Identify the cause — usually moisture, improper primer, or paint applied over a contaminated surface.
- Scrape all loose or peeling paint using a putty knife. Do not try to paint over loose edges.
- Sand the edges of the scraped areas smooth and feather them into the surrounding paint.
- Repair the underlying surface — spackle, joint compound, or drywall tape depending on the extent of damage.
- Prime the repaired area with a stain-blocking primer.
- Apply two coats of ceiling paint.
What Color Should You Paint a Ceiling?
The standard is flat white — it reflects light, makes the room feel taller, and pairs with everything. Most ceiling paint is sold as a bright white or off-white.
For something different:
Slightly darker than the walls. Painting the ceiling a shade or two darker than the walls — not dramatically darker — adds depth and makes the room feel cozy rather than cavernous. Works especially well in dining rooms and bedrooms.
Black or very dark. A black ceiling in a room with good natural light creates a dramatic, architectural effect. It absorbs the ceiling visually — the eye focuses on the walls and furnishings rather than the overhead plane. Use flat or matte finish to avoid reflection.
A bold color. Painting the “fifth wall” a saturated color (deep blue, forest green, terracotta) is a strong design statement. It works best in rooms with high ceilings — 9 feet or higher — where the color does not feel oppressive.
Sky or mural. For a kid’s bedroom or sunroom, painting clouds with a sponge on a blue base like Bluebell SW 6793 is a beginner-friendly decorative technique. Apply the sky base color first, let it dry, then dab a white cloud color onto the surface with a damp natural sponge.
How Much Does It Cost to Paint a Ceiling?
DIY cost: A gallon of ceiling paint covers 300–400 square feet and costs $25–$50 for standard formulas and $50–$75 for premium brands. A standard 12×12 room ceiling (144 sq ft) requires 1 gallon for two coats. With supplies — paint tray, roller cover, tape, drop cloth — a first-time DIY ceiling project runs $60–$150.
Professional cost: Professional painters typically charge $1 to $3 per square foot for ceiling painting, including labor and materials. A standard bedroom ceiling runs $150 to $400 professionally. Large living rooms or vaulted ceilings with difficult access run higher — $400 to $800 or more depending on height and complexity.
FAQs: How to paint a Ceiling?
Should you paint the ceiling or walls first?
Always paint the ceiling first. Ceiling paint drips and spatters onto walls below. If you paint walls first, you risk landing ceiling paint on a finished surface. Paint the ceiling, let it dry, then paint the walls.
How do you paint a ceiling without streaks?
Roll perpendicular to the windows, maintain a wet edge at all times, and work in 3- to 4-foot sections. Lap marks come from rolling over dry paint. Keep a consistent pace and do not go back over sections that have started to set.
How do you cut in a ceiling?
Use a 2.5-inch angled brush loaded one-third up the bristles. Start slightly away from the tape line, guide the brush tip toward the edge, and pull in one smooth stroke. Always cut in one section and roll it immediately while the edges are wet — do not cut in the entire ceiling before rolling.
What is the best roller nap for a ceiling?
3/8-inch nap for smooth flat ceilings. 1/2-inch for lightly textured. 3/4-inch for heavy texture or popcorn. The nap must be thick enough to reach the low points of any texture — too thin and you leave bare patches.
How long does ceiling paint take to dry?
Flat latex ceiling paint is dry to the touch in 1 hour and ready for a second coat in 2–4 hours. Full cure takes 14–30 days. Do not reattach light fixtures or let steam-producing appliances run until the paint is fully dry.
How do you paint a ceiling in a small room?
A small room — bathroom, closet, laundry room — can be cut in entirely with a brush and rolled with a mini 4-inch roller. The Wagner SMART Roller (which feeds paint through the handle) is particularly good for small ceiling jobs because you can refill without descending a ladder. Work carefully near the edges — small rooms leave less margin for error.
How many coats of paint does a ceiling need?
Two coats in most cases. One coat over an existing similar-color ceiling in good condition may be enough, but two coats always gives better coverage, a more uniform sheen, and a more durable finish.
The Bottom Line
Painting a ceiling comes down to four things: prep the room properly, cut in while you can still roll into wet edges, roll in the right direction at the right speed, and use a flat ceiling paint with a stain-blocking primer wherever the surface is compromised.
The two upgrades that make the biggest difference for beginners are an extension pole (eliminates constant ladder climbing) and ceiling-specific paint (significantly reduces splatter). Add Frog Tape for clean lines at the wall, two coats instead of one, and the patience to let each coat dry before the next, and the result will look professional.
Related Articles:
- How to Paint a Room: 7 Proven Steps to a Perfect Finish
- How Long Does Paint Take to Dry? Every Surface, Every Paint Type
- How to Fix Chipped Paint on a Wall: A Complete Repair Guide
- Best Primers for Every Surface: Oil-Based vs. Water-Based
- How to Choose a Paint Finish: Flat vs. Eggshell vs. Satin vs. Semi-Gloss